Viking Health and Wellness
Exclusive Serenity Lounge Sauna with Far Infrared and Natural Red Cedar Aromatherapy for Exquisite Personal Relaxation
Exclusive Serenity Lounge Sauna with Far Infrared and Natural Red Cedar Aromatherapy for Exquisite Personal Relaxation
Couldn't load pickup availability
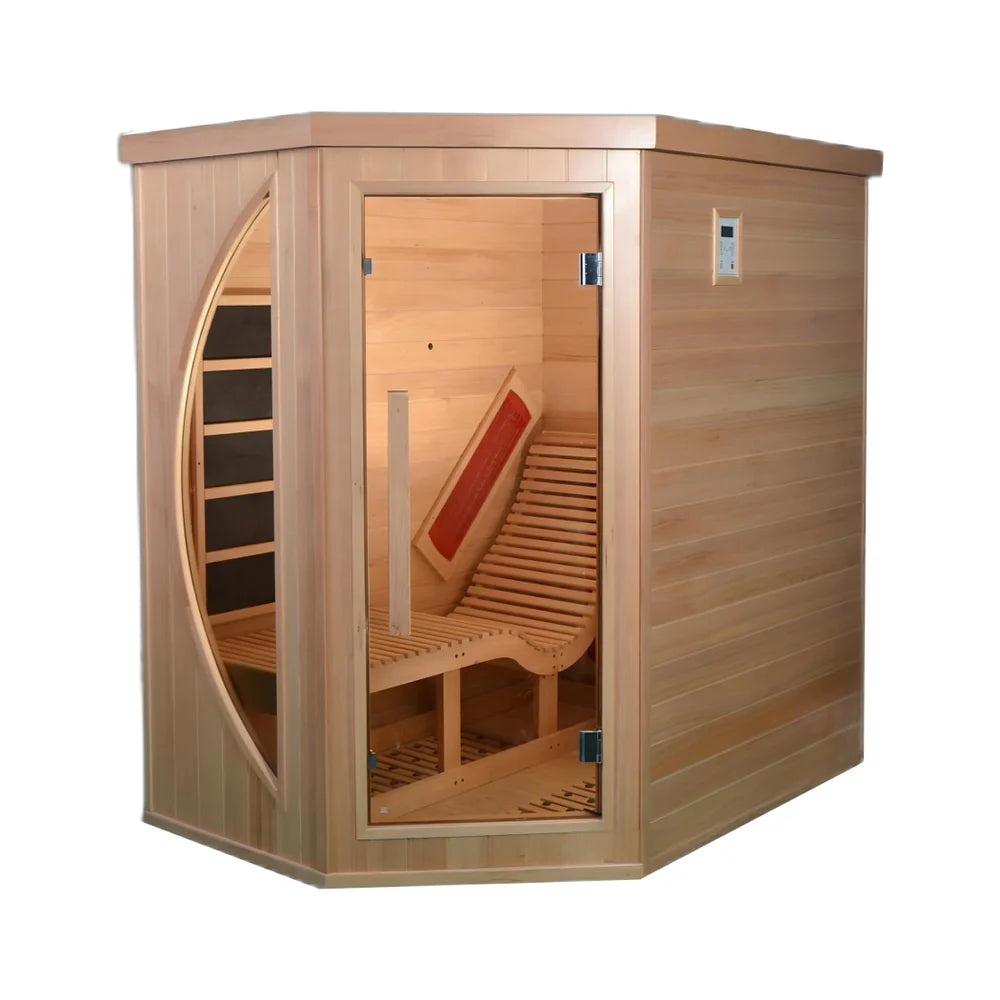
Exclusive Serenity Lounge Sauna with Far Infrared and 100% Natural Red Cedar Aromatherapy
Experience the Luxury of Exquisite Personal Wellness at Home
Transform your indoor space into a private wellness retreat with this Exclusive Premium Red Cedar Far Infrared Lounge Sauna, thoughtfully designed to deliver full-body relaxation, rejuvenation, and comfort in an elegant, space-conscious design.
Expertly crafted from 100% natural Red Cedar - renowned for it's rich aroma, exceptional durability, and natural resistance to moisture - this luxury sauna creates an elevated spa experience within the comfort of your home. This spacious lounge chair allows you to recline and unwind, offering superior comfort that traditional seated saunas simply cannot match.
Advanced far infrared heating technology provides gentle, penetrating warmth designed to soothe tired muscles, promote healthy circulation, and support the body's natural wellness and recovery processes.
Refined Features & Premium Details
- Elegant Tempered Glass Door, Crescent Viewing Window - Beautifully designed to enhance any interior while maintaining optimal heat retention. The sophisticated glass accents create an open, airy feel and complement both modern and traditional decor.
- Authentic Aromatic Red Cedar Interior - As the sauna warms, the natural cedar releases its distinctive calming fragrance, transforming every session into a restorative sensory escape.
- Luxurious Full-Length Reclining Lounge - Designed to complete relaxation, allowing you to stretch out comfortably and enjoy an immersive wellness experience.
- Compact Footprint, Exceptional Experience - Perfect for bedrooms, home gyms, wellness rooms, or private retreats, offering spa-quality relaxation without sacrificing valuable space.
Whether you're seeking post-workout recovery, daily stress relief, or a dedicated self-care sanctuary, this beautifully crafted infrared sauna combines sophisticated design, premium materials, and therapeutic performance to being the luxury of the world-class spa directly into your home.
Specifications
Dimensions: 62.9*81.1*78.7 in / 903.9 lb
Package Dimensions:74*18*83 in /1102.3 lb
Walls: 1.49 in red cedar logs
Front Wall: 0.314 in tempered glass
· Dedicated 240 V / 30 A -50A circuit for the heater (please consult a certified electrician for installing/modifying any of your electrical)
Packaging: Wooden box

Sauna Installation Tip
When installing a sauna, following these tips will ensure a smooth installation process and ensure the safety and functionality of the sauna:
1. Choose a suitable location
Ground selection: Make sure the ground is flat and solid to support the weight of the sauna. Avoid installing in low-lying or water-logged areas.
Ventilation and privacy: Choose a place with good ventilation and privacy protection to avoid strong winds blowing directly in.
2. Preparation
Measure the space: Accurately measure the location of the sauna before installation to ensure sufficient space for installation and future maintenance.
Check the power supply: If using an electric heater, make sure there is a suitable power socket near the installation site and that it meets the power safety standards.
3. Preparation before assembly
Check the components: Before assembly, check that all components are complete and undamaged, including wall panels, seats, heaters, etc.
Tool preparation: Prepare the required tools, such as screwdrivers, electric drills, level rulers, etc., to ensure a smooth installation process.
4. Installation steps
Ground foundation: Make sure the ground is dry and flat, and lay moisture-proof mats or floor mats if necessary.
Wall Installation: Install the wall step by step according to the instructions/video, and ensure that the wall panels are firmly connected to the ground and ceiling.
Heating System: When installing the heater, follow the Oasislux sauna heater instructions to ensure safe cable connections and check whether the position of the heater meets ventilation requirements.
Seats and Accessories: Install seats and other accessories according to the design drawings to ensure a secure installation and ergonomic design.
5. Sealing and Insulation
Sealing: Ensure that the doors and windows of the sauna room are well sealed to prevent heat loss and moisture from entering.
Insulation: Check whether the internal insulation is installed in place to improve thermal efficiency and comfort.
6. Ventilation System
Exhaust Vents: Install reasonable exhaust vents to ensure air circulation and prevent moisture accumulation.
Air Intake Vents: Ensure that the air intake vents are properly located to provide fresh air.
7. Electrical Inspection
Safety Test: After installation, perform a safety check of the electrical system, including the heater and control panel, to ensure normal operation and no safety hazards.
Grounding Measures: Ensure that the electrical system is properly grounded to prevent the risk of leakage.
8. Cleaning and inspection
Internal cleaning: After installation, clean the interior of the sauna to remove possible construction residues and dust.
Functional test: Perform a comprehensive functional test to check the normal operation of the temperature control system, heater and other equipment.
9. Preparation for use
Preheat the sauna: Before first use, preheat it, check the performance of the temperature control system, and allow the interior of the sauna to dry out fully.
User guide: Read and understand the user guide of the sauna to ensure safe use.
10. Regular maintenance
Inspection and maintenance: Regularly check the structure and electrical system of the sauna to ensure its continued safe operation.
Cleaning and maintenance: Regularly clean the wood surface and other components to keep the sauna hygienic and beautiful.
By following these installation tips, you can ensure a smooth installation process of the sauna and enjoy a comfortable and safe use experience. If you have any questions or need further assistance, please consult online customer service or contact the after-sales email info@heliussauna.com
When installing a sauna, following these tips will ensure a smooth installation process and ensure the safety and functionality of the sauna:
When installing a sauna, following these tips will ensure a smooth installation process and ensure the safety and functionality of the sauna:
1. Choose a suitable location
Ground selection: Make sure the ground is flat and solid to support the weight of the sauna. Avoid installing in low-lying or water-logged areas.
Ventilation and privacy: Choose a place with good ventilation and privacy protection to avoid strong winds blowing directly in.
2. Preparation
Measure the space: Accurately measure the location of the sauna before installation to ensure sufficient space for installation and future maintenance.
Check the power supply: If using an electric heater, make sure there is a suitable power socket near the installation site and that it meets the power safety standards.
3. Preparation before assembly
Check the components: Before assembly, check that all components are complete and undamaged, including wall panels, seats, heaters, etc.
Tool preparation: Prepare the required tools, such as screwdrivers, electric drills, level rulers, etc., to ensure a smooth installation process.
4. Installation steps
Ground foundation: Make sure the ground is dry and flat, and lay moisture-proof mats or floor mats if necessary.
Wall Installation: Install the wall step by step according to the instructions/video, and ensure that the wall panels are firmly connected to the ground and ceiling.
Heating System: When installing the heater, follow the Oasislux sauna heater instructions to ensure safe cable connections and check whether the position of the heater meets ventilation requirements.
Seats and Accessories: Install seats and other accessories according to the design drawings to ensure a secure installation and ergonomic design.
5. Sealing and Insulation
Sealing: Ensure that the doors and windows of the sauna room are well sealed to prevent heat loss and moisture from entering.
Insulation: Check whether the internal insulation is installed in place to improve thermal efficiency and comfort.
6. Ventilation System
Exhaust Vents: Install reasonable exhaust vents to ensure air circulation and prevent moisture accumulation.
Air Intake Vents: Ensure that the air intake vents are properly located to provide fresh air.
7. Electrical Inspection
Safety Test: After installation, perform a safety check of the electrical system, including the heater and control panel, to ensure normal operation and no safety hazards.
Grounding Measures: Ensure that the electrical system is properly grounded to prevent the risk of leakage.
8. Cleaning and inspection
Internal cleaning: After installation, clean the interior of the sauna to remove possible construction residues and dust.
Functional test: Perform a comprehensive functional test to check the normal operation of the temperature control system, heater and other equipment.
9. Preparation for use
Preheat the sauna: Before first use, preheat it, check the performance of the temperature control system, and allow the interior of the sauna to dry out fully.
User guide: Read and understand the user guide of the sauna to ensure safe use.
10. Regular maintenance
Inspection and maintenance: Regularly check the structure and electrical system of the sauna to ensure its continued safe operation.
Cleaning and maintenance: Regularly clean the wood surface and other components to keep the sauna hygienic and beautiful.
By following these installation tips, you can ensure a smooth installation process of the sauna and enjoy a comfortable and safe use experience. If you have any questions or need further assistance, please consult online customer service or contact the after-sales email info@heliussauna.com
1. Choose a suitable location
Ground selection: Make sure the ground is flat and solid to support the weight of the sauna. Avoid installing in low-lying or water-logged areas.
Ventilation and privacy: Choose a place with good ventilation and privacy protection to avoid strong winds blowing directly in.
2. Preparation
Measure the space: Accurately measure the location of the sauna before installation to ensure sufficient space for installation and future maintenance.
Check the power supply: If using an electric heater, make sure there is a suitable power socket near the installation site and that it meets the power safety standards.
3. Preparation before assembly
Check the components: Before assembly, check that all components are complete and undamaged, including wall panels, seats, heaters, etc.
Tool preparation: Prepare the required tools, such as screwdrivers, electric drills, level rulers, etc., to ensure a smooth installation process.
4. Installation steps
Ground foundation: Make sure the ground is dry and flat, and lay moisture-proof mats or floor mats if necessary.
Wall Installation: Install the wall step by step according to the instructions/video, and ensure that the wall panels are firmly connected to the ground and ceiling.
Heating System: When installing the heater, follow the Oasislux sauna heater instructions to ensure safe cable connections and check whether the position of the heater meets ventilation requirements.
Seats and Accessories: Install seats and other accessories according to the design drawings to ensure a secure installation and ergonomic design.
5. Sealing and Insulation
Sealing: Ensure that the doors and windows of the sauna room are well sealed to prevent heat loss and moisture from entering.
Insulation: Check whether the internal insulation is installed in place to improve thermal efficiency and comfort.
6. Ventilation System
Exhaust Vents: Install reasonable exhaust vents to ensure air circulation and prevent moisture accumulation.
Air Intake Vents: Ensure that the air intake vents are properly located to provide fresh air.
7. Electrical Inspection
Safety Test: After installation, perform a safety check of the electrical system, including the heater and control panel, to ensure normal operation and no safety hazards.
Grounding Measures: Ensure that the electrical system is properly grounded to prevent the risk of leakage.
8. Cleaning and inspection
Internal cleaning: After installation, clean the interior of the sauna to remove possible construction residues and dust.
Functional test: Perform a comprehensive functional test to check the normal operation of the temperature control system, heater and other equipment.
9. Preparation for use
Preheat the sauna: Before first use, preheat it, check the performance of the temperature control system, and allow the interior of the sauna to dry out fully.
User guide: Read and understand the user guide of the sauna to ensure safe use.
10. Regular maintenance
Inspection and maintenance: Regularly check the structure and electrical system of the sauna to ensure its continued safe operation.
Cleaning and maintenance: Regularly clean the wood surface and other components to keep the sauna hygienic and beautiful.
By following these installation tips, you can ensure a smooth installation process of the sauna and enjoy a comfortable and safe use experience.
Care And Maintenance
1. Regular cleaning
Floors and walls: Use warm water and a mild detergent (such as neutral soap) to wipe the floors and walls. Avoid using chemical cleaners to prevent damage to the wood.
Seats and armrests: These areas often come into contact with the skin. Use a damp cloth and a mild detergent to wipe them, and regularly sand them with fine sandpaper to keep the surface smooth.
Ceilings and lamps: Avoid condensation on lamps, wipe the ceiling regularly, and keep it dry.
2. Ventilation
Make sure the sauna is well ventilated after each use to prevent the growth of mold and bacteria. Open doors, windows or vents to allow air to circulate until the sauna is completely dry.
3. Check the condition of the wood
Check the wood regularly for cracks, deformation or corrosion. If problems are found, replace damaged boards in time. Avoid using oil products when caring for wood, as these products may affect the heating performance of the sauna.
4. Control humidity and temperature
Use appropriate humidity and temperature settings and avoid long-term exposure to excessive humidity or temperature, which can extend the life of the wood. Install a hygrometer and thermometer, monitor regularly and ensure they are within the recommended range (usually 40%-60% humidity and 70°C-100°C temperature).
5. Heater Maintenance
Remove dust and debris from the heater surface regularly to ensure efficient operation of the heater. Use appropriate stones and replace them regularly according to the manufacturer's recommendations.
If using an electric heater, check that the wire connections are secure to prevent electrical faults.
6. Prevent Mold and Bacteria
Use an anti-mold and anti-bacteria spray to treat the interior of the sauna, especially in humid areas.
Lay removable wooden or plastic floor mats on the floor to facilitate cleaning and reduce the possibility of mold growth.
7. Regular Inspection and Maintenance
Develop a plan for regular inspections of the sauna, including inspections of key components such as wood, electrical systems, and heaters. Depending on the frequency of use, have a professional perform a comprehensive inspection and maintenance of the sauna every year or every few years.
8. Maintain Doors and Windows
Check the tightness of the sauna doors and windows regularly to ensure that there are no air leaks and prevent heat loss. Lubricate the door hinges and locks regularly to ensure that the doors and windows open and close smoothly.